01. Hello 서블릿
- 이번 시간에는 스프링 부트 환경에서 서블릿을 등록하고 사용하는 시간을 갖는다
- Spring F/W 만으로 등록하는 환경 역시 가능하지만 손이 많이 가기에 Spring Boot 사용
- 서블릿은 톰캣 같은 WAS 서버를 직접 설치해야 함
- 이렇게 설치 된 WAS 위에 서블릿 코드를 클래스 파일로 빌드해서 올려야함
- 톰캣 서버를 실행(이미 구동 중인 경우 재실행) 해주면 된다
- 하지만 Spring Boot는 이미 내부 모듈에 내장 WAS(Tomcat, Undertow, Netty)를 가지고 있기 때문에 Spring Boot를 기반으로 하여 WAS를 구성한다
01-1. 스프링 부트 서블릿 환경 구성?
package hello.servlet;

import org.springframework.boot.SpringApplication;
import org.springframework.boot.autoconfigure.SpringBootApplication;
import org.springframework.boot.web.servlet.ServletComponentScan;

@ServletComponentScan
@SpringBootApplication
public class ServletApplication {
    public static void main(String[] args) {
        SpringApplication.run(ServletApplication.class, args);
    }
}- 서블릿 환경 구성을 위해서는 @ServletComponentScan 어노테이션을 사용해야 함
- @ServletComponentScan
- 스프링이 자동으로 현재 패키지 경로를 기준으로 하위 패키지의 모든 서블릿을 찾아서 등록을 해준다.
- Spring Boot에서의 ComponentScan이라는 개념과 마찬가지로 비슷한 동작을 수행한다.
- ComponentScan은 현재 패키지 경로를 기준으로 하위 패키지의 모든 Bean(빈)을 찾아서 IOC 컨테이너에 Bean을 등록해주는 역할을 한다
01-2. HelloServlet 클래스 생성
package hello.servlet.basic;

import javax.servlet.ServletException;
import javax.servlet.annotation.WebServlet;
import javax.servlet.http.HttpServlet;
import javax.servlet.http.HttpServletRequest;
import javax.servlet.http.HttpServletResponse;
import java.io.IOException;

/**
 * 서블릿 생성
 */
@WebServlet(name = "helloServlet", urlPatterns = "/hello")
public class HelloServlet extends HttpServlet {

    @Override
    protected void service(HttpServletRequest request, HttpServletResponse response) throws ServletException, IOException {
        // Client -> Server에 요청 -> WAS가 HttpServletRequest, HttpServletResponse 객체 생성 -> 서블릿에게 전달
        System.out.println("HelloServlet.service");
        System.out.println("request = " + request);
        System.out.println("response = " + response);

        String username = request.getParameter("username");
        System.out.println("username = " + username);

        response.setContentType("text/plain"); // response data type
        response.setCharacterEncoding("UTF-8"); // response encoding type
        response.getWriter().write("hello " + username);
    }
}
- localhost:8080/hello 라는 URL을 웹 브라우저에 입력하면 해당 요청 URL에 매핑되는 helloServlet 클래스 호출
- @WebServlet
- name: 서블릿 이름
- urlPatterns: URL 매핑
- HTTP 요청을 통해 매핑된 URL이 호출되면 서블릿 컨테이너가 다음 메서드를 실행한다
- protected void service(HttpServletRequestrequest, HttpServletResponseresponse)
만약 HTTP 요청 정보에 대해 조금 더 자세히 보고 싶다면 application.properties에 아래 로직을 추가하면 된다.
하지만 운영(PROD) 서버에서 모든 로그를 출력하는 것은 지양해야 하는 부분이다(성능 저하, 보안 유출)
# HTTP 요청 정보 확인
logging.level.org.apache.coyote.http11=debug
2023-05-07 15:26:43.776 DEBUG 19196 --- [nio-8080-exec-1] o.a.coyote.http11.Http11InputBuffer      : Before fill(): parsingHeader: [true], parsingRequestLine: [true], parsingRequestLinePhase: [0], parsingRequestLineStart: [0], byteBuffer.position(): [0], byteBuffer.limit(): [0], end: [0]
2023-05-07 15:26:43.777 DEBUG 19196 --- [nio-8080-exec-1] o.a.coyote.http11.Http11InputBuffer      : Received [GET / HTTP/1.1
Host: localhost:8080
Connection: keep-alive
sec-ch-ua: "Chromium";v="112", "Google Chrome";v="112", "Not:A-Brand";v="99"
sec-ch-ua-mobile: ?0
sec-ch-ua-platform: "Windows"
Upgrade-Insecure-Requests: 1
User-Agent: Mozilla/5.0 (Windows NT 10.0; Win64; x64) AppleWebKit/537.36 (KHTML, like Gecko) Chrome/112.0.0.0 Safari/537.36
Sec-Purpose: prefetch;prerender
Purpose: prefetch
Accept: text/html,application/xhtml+xml,application/xml;q=0.9,image/avif,image/webp,image/apng,*/*;q=0.8,application/signed-exchange;v=b3;q=0.7
Sec-Fetch-Site: none
Sec-Fetch-Mode: navigate
Sec-Fetch-User: ?1
Sec-Fetch-Dest: document
Accept-Encoding: gzip, deflate, br
Accept-Language: ko,en;q=0.9,zh-TW;q=0.8,zh;q=0.7,th;q=0.6,pt-BR;q=0.5,pt;q=0.4,fil;q=0.3,en-US;q=0.2,zh-CN;q=0.1

]
01-3. 서블릿 컨테이너 동작 과정 정리

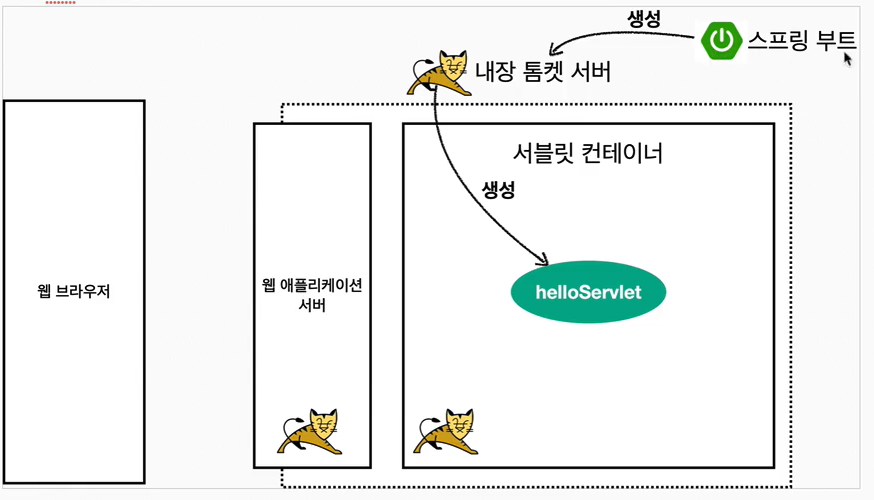
- 스프링 부트를 통해 애플리케이션을 구동하였다. 이때 내장 톰캣 서버을 먼저 구동 시킨다
- 톰캣 서버는 컨테이너 기능을 통해서 서블릿을 생성한다
- WAS는 내부에 서블릿 컨테이너(Servlet Container) 기능을 가지고 있다고 한다
현재 서블릿 컨테이너에 의해 서블릿이 생성이 되어 있는 상황이다.
다음은 유저가 서버에 HTTP 요청을 한다고 가정 해보자.

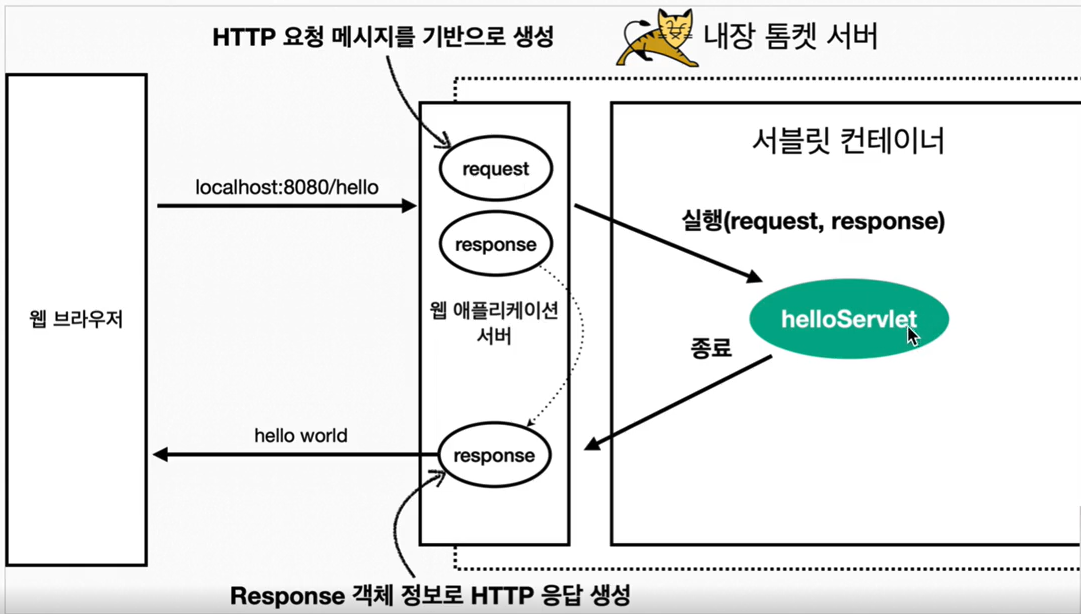
- Client는 GET /hello URL을 통해 서버에 정보를 요청 한다
- 이 때 WAS 서버는 해당 유저의 요청 처리를 위해 다음과 같이 동작을 수행한다

- 최초로 HttpServletRequest request, HttpServletResposne response 객체를 생성 한다
- 후에 2개의 객체를 helloServlet에게 전달 한다 (다음과 같이 mapping이 되어 있기에)
- ex) @WebServlet(name = "helloServlet", urlPatterns = "/hello")
- 필요한 작업을 수행하고 response 객체에 값을 저장 후 반환해주는 메커니즘
- ex) response.getWriter().write("hello " + username);
이처럼 서블릿은 개발자가 일일이 수행해야 하는 작업(TCP/IP Socket 연결, HTTP Body(본문) 파싱)을 대신 수행해주고 개발자는 비즈니스 로직 작성에만 집중하도록 도와준다. 또한 서블릿은 Java 웹 애플리케이션에서 동적인 컨텐츠를 생성하기 위한 Java 클래스라 보면 된다.
지금까지 간단한 Servlet 클래스를 생성하여 request, response 객체의 값을 찍어보고 직접 값을 넣은 후에 반환까지 해보는 과정을 거쳤다. 다음으로 Welcome 페이지를 생성하여 서블릿에 요청 시 해당 페이지를 보여주는 작업을 진행 해보자.
01-4. Welcome 페이지 생성

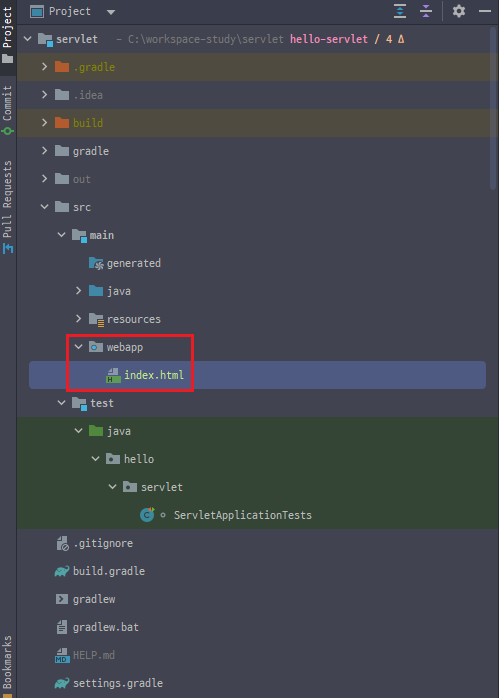
- src/main/ 경로에 webapp 디렉토리를 생성 후 index.html 파일을 추가한다
- HTML의 내용은 다음과 같다
- index.html
- basic.html
<!DOCTYPE html>
<html>
<head>
    <meta charset="UTF-8">
    <title>Title</title>
</head>
<body>
<ul>
    <li><a href="basic.html">서블릿 basic</a></li>
</ul>
</body>
</html>
<!DOCTYPE html>
<html>
<head>
  <meta charset="UTF-8">
  <title>Title</title>
</head>
<body>
<ul>
  <li>hello 서블릿
    <ul>
      <li><a href="/hello?username=servlet">hello 서블릿 호출</a></li>
    </ul>
  </li>
  <li>HttpServletRequest
    <ul>
      <li><a href="/request-header">기본 사용법, Header 조회</a></li>
      <li>HTTP 요청 메시지 바디 조회
        <ul>
          <li><a href="/request-param?username=hello&age=20">GET - 쿼리 파라미터</a></li>
          <li><a href="/basic/hello-form.html">POST - HTML Form</a></li>
          <li>HTTP API - MessageBody -> Postman 테스트</li>
        </ul>
      </li>
    </ul>
  </li>
  <li>HttpServletResponse
    <ul>
      <li><a href="/response-header">기본 사용법, Header 조회</a></li>
      <li>HTTP 응답 메시지 바디 조회
        <ul>
          <li><a href="/response-html">HTML 응답</a></li>
          <li><a href="/response-json">HTTP API JSON 응답</a></li>
        </ul>
      </li>
    </ul>
  </li>
</ul>
</body>
</html>
다음으로 localhost:8080 에 요청을 보내면 다음과 같은 화면이 출력 된다.

'Spring Boot > MVC 백엔드 2탄 - Self Study' 카테고리의 다른 글
| [스프링 MVC - 백엔드 웹 개발 기술] HTTP 요청 방식 - GET, POST, HTTP API (0) | 2023.05.14 |
|---|---|
| [스프링 MVC - 백엔드 웹 개발 기술] HttpServletRequest 개요와 기본 사용법 (0) | 2023.05.07 |
| [스프링 MVC - 백엔드 웹 개발 기술] Spring Boot MVC 프로젝트 생성 (0) | 2023.05.07 |
| [스프링 MVC - 백엔드 웹 개발 기술] HTML, HTTP API, CSR, SSR, 자바 백엔드 기술 웹 역사 (0) | 2023.04.30 |
| [스프링 MVC - 백엔드 웹 개발 기술] 동시 요청 - 멀티 쓰레드 (0) | 2023.04.26 |


